In Microsoft Excel, a fill handle is a feature to extend (and fill) several numbers, dates, or even text to other cells. In the active cell of the spreadsheet, the fill handle is a small black box at the bottom-right corner, as shown in the image below:

Copy a formula by dragging the fill handle
-
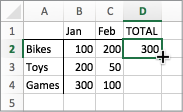
Select the cell that has the formula you want to fill into adjacent cells.
-
Rest your cursor in the lower-right corner so that it turns into a plus sign (+), like this:
-
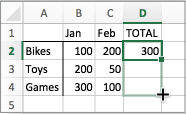
Drag the fill handle down, up, or across the cells that you want to fill. In this example, the figure here shows dragging the fill handle down:
-
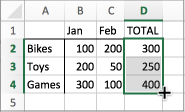
When you let go, the formula gets automatically filled to the other cells:
-
To change how you want to fill cells, click the Auto Fill Options button  that appears after you finish dragging, and pick the option that want.
Having trouble seeing the file handle?
If you don’t see the fill handle, it might be hidden. To display it:
-
On the Excel menu, click Preferences.
-
Click Edit.
-
Under Edit Options, check the Allow fill handle and cell drag-and-drop box.
If automatic workbook calculation isn’t working, formulas won’t recalculate when you fill cells. Here’s how to turn it on:
-
On the Excel menu, click Preferences.
-
Click Calculation.
-
In Calculation Options, ensure that Automatic is selected.